This blog is about C++, CakePHP, Linux, PEAR, PHP, Pyrus, Apache, and MySQL and related topics.

Saturday, December 27, 2008

Bluefish Editor 1.0 IDE

To quote from their website at : Bluefish Home Page, Bluefish Editor is

a powerful editor targeted towards programmers and webdesigners, with many options to write websites, scripts and programming code. Bluefish supports many programming and markup languages, and it focuses on editing dynamic and interactive websites. See features for an extensive overview, take a look at the screenshots, or download it right away. Bluefish is an open source development project, released under the GNU GPL licence.


I've tried this IDE mostly for HTML and PHP. I like using it because it is easy to use. It is also free. And it is easy to install if you have Ubuntu on your desktop.

To get Bluefish all you have to do is open a terminal and type: pt-get install bluefish.


Thursday, December 18, 2008

How to install CakePHP on Linux Ubuntu 8.10 (Step 3.3)

In this blog post I am going to show how I installed CakePHP on my Ubuntu Linux computer. CakePHP does have instructions on how to do this but even with the instructions there are several points where you can run into problems, so I'm writing this to help anyone with a similar setup and also to remember what I did!

I intend this to be a companion to the installation guide that can be accessed here (cake guide).

My setup:
(step 3.1)

Linux Ubuntu 8.10
Apache 2.2.9-7ubuntu3
PHP 5.2.6-2ubuntu4
MySQL 5.0.67-0ubuntu6

(To keep things simple I will not list all the modules installed)

mod_rewrite

To enable mod_rewrite I typed the following in the Terminal:

sudo a2enmod rewrite


Get CakePHP: (Step 3.2.1)

Getting CakePHP was easy I just went to the main website and downloaded the latest version which at the time of this article is version 1.2.0.7692 RC3.

There are four different files to choose from, I chose cake-1.2.0.7692-rc3.tar.gz

I downloaded the tar.gz file to my desktop

Installation Options: (Step 3.3)

There are three main installation types, Development, Production, and Advanced. Development is the easiest option, but is less secure. Production allows an entire domain to act as a single CakePHP application, is very secure, and has clean URL's. The Advanced option is more complicated and requires more configuration.

I decided that Production is the way to go.

Switching to the Terminal I created a cake_install directory as follows:

cd /var
sudo mkdir cake_install

Next, I went to the desktop and extracted the files there (right click). Then using the Terminal I copied the contents into the cake_install directory like this:

cd /home/jon/Desktop/cake_1.2.0.7692-rc3
sudo cp -r * /var/cake_install

Now my directory structure looks like this:

/var/cake_install/app/
/var/cake_install/cake/
/var/cake_install/docs/
/var/cake_install/vendors/
/var/cake_install/index.php

/app/tmp permissions: (Step 3.2.2)

Once I got here I went back to step 3.2.2 to make the /app/tmp folder writable by the web server user.

In the Terminal now, I navigated to the app folder to verify the current permissions:

cd /var/cake_install/app/
ls -ld tmp

and this is the output:

drwxr-xr-x 6 www-data www-data 4096 2008-12-18 11:30 tmp

If you see root instead of www-data then you need to type this command in the terminal:

sudo chown www-data:www-data /var/cake_install/app/tmp


Almost done. The next step was to change the DocumentRoot to /var/cake_install/app/webroot

(how to create a new site in Apache is described here)

In the Terminal I typed:

sudo cp /etc/apache2/sites-available/default /etc/apache2/sites-available/mysite
sudo nano /etc/apache2/sites-available/mysite

I changed the DocumentRoot to point to: /var/cake_install/app/webroot

Then I saved the file. (like this: Ctrl-X to exit, Y to save, then enter to confirm address of file.)

Then I had to deactivate the old site and activate the new one.

In the Terminal I typed:

sudo a2dissite default && sudo a2ensite mysite

then to reload Apache so the new configuration will be in effect, I typed:

/etc/init.d/apache2 reload

To verify it is working correctly you type www.example.com in your browser where example is your domain. If you are running as localhost then type http://localhost/.

If your web server is configured correctly, you should now find your Cake application accessible there.

If there are any errors in your installation they will show up on this screen.

I had the following errors to fix before I could consider the job complete:

Warning 512: /var/cake_install/app/tmp/cache/ is not writable [CORE/cake/libs/cache/file.php, line 262]

Notice 1024: Please change the value of 'Security.salt' in app/config/core.php to a salt value specific to your application [CORE/cake/libs/debugger.php, line 541]

Your database configuration file is NOT present.
Rename config/database.php.default to config/database.php


I found the solution to Warning 512 , on SitePoint's forums which references a post on the CakePHP Google Group. To fix this you go to the app directory like this:

cd /var/cake_install/app/
then as administrator you fix the permissions like this:
sudo chmod -R 0777 tmp

I reloaded the browser and the error is now gone.

Next to fix Notice 1024 I found this solution.


The solution says to open the core.php file at app/config and change one digit in the salt. So first I navigated to the right folder:

cd /var/cake_install/app/config

Then to change the permissions so that I could edit the file I did this:

sudo chown jon:jon /var/cake_install/app/config/core.php

To open and edit the file I typed:

gedit core.php

I scrolled down to Security.salt. Then I changed one character in the salt, saved, then closed the file. I reloaded the browser. Problem fixed!

Two down one to go.


Now my last little problem is this one:

Your database configuration file is NOT present.
Rename config/database.php.default to config/database.php

I used the Terminal to rename the file. For info, type man mv in the Terminal or refer to this.

sudo mv /var/cake_install/app/config/database.php.default /var/cake_install/app/config/database.php

Problem fixed!

A new message pops up that "Cake is NOT able to connect to database" and I'll deal with that seperately, I'm just glad to make it this far.


Tuesday, December 16, 2008

How to install Smarty template

My first attempt to install the Smarty Template Engine was to follow the basic installation instructions from the Smarty manual. The very first sentence says to: "Install the Smarty library files which are in the /libs/ sub directory of the distribution." What? I was lost right from the get-go. I'm one of those guys that likes clarity. This is not clarity.

So, I decided to go the easy route. Since I have Ubuntu Linux 8.10 running on my computer, the easy way would be to install the Smarty Template Engine package using the Synaptic Package Manager (System > Administration > Synaptic Package Manager). I did a quick search for Smarty and sure enough it was there so I installed it. This was very easy to do.

So, going back to the basic installation instructions I created the following script and tried to run it.

// NOTE: Smarty has a capital 'S'
require_once('Smarty.class.php');
$smarty = new Smarty();
?>


And this was the result:

Warning
: require_once(Smarty.class.php) [function.require-once]: failed to open stream: No such file or directory in /var/www/smartytest.php on line 3

Fatal error: require_once() [function.require]: Failed opening required 'Smarty.class.php' (include_path='.:/usr/share/php:/usr/share/pear') in /var/www/smartytest.php on line 3

I was prepared for this since the instructions warned me this might happen and it also gave four possible solutions.

Again I decided to go with the easy solution and set the include_path as follows:

;;;;;;;;;;;;;;;;;;;;;;;;;
; Paths and Directories ;
;;;;;;;;;;;;;;;;;;;;;;;;;

; *nix: "/path1:/path2"
include_path = ".:/usr/share/php:/usr/local/lib/Smarty-v.e.r/libs/"

; Windows: "\path1;\path2"
include_path = ".;c:\php\includes;c:\webroot\libs\Smarty-v.e.r\libs\"

This didn't work either, I got the same error message. So I figured it must be in a different folder and all I have to do is find the folder. Going back into the Synaptic Package Manager I located Smarty again and by right clicking Smarty and selecting properties I was able to see the location of the installed files. I thought that with the correct path I would get Smarty up and running. Nope.

I searched in the forums at ubuntuforums.org and didn't find anything useful.

I searched the Smarty forums and found this thread. There lokie gives four steps to installing Smarty but again I found myself lost because it wasn't 100% clear what to do.

That's when I decided I would have to write this post because there seems to be two kinds of PHP programmers out there. Those who don't need very detailed explanations and those that do. I'm in the second category and judging by the messages I see in the forums I am not the only one.

To get Smarty up and running this is what I did:

1. I went to the download page on Smarty's website, located at: http://www.smarty.net/download.php

2. I downloaded the most recent stable version which at the time of writing is: Smarty 2.6.20 (.tar.gz) (.zip) August 15th, 2008

3. I created a folder Smarty at /var/www/smarty to temporarily hold my files

4. I extracted the contents of the .tar.gz file into the smarty folder.

5. Inside the Smarty folder is one folder called Smarty-2.6.20, and inside this folder there are four folders and ten files.

The folder were demo, libs, misc, and unit_test.
The files were BUGS, Changelog, COPYING.lib, FAQ, INSTALL, NEWS, QUICK_START, README, RELEASE_NOTES, and TODO.

6. I opened and read QUICK_START and decided to follow these instructions as close as possible.

7. I made my directory structure as follows: /usr/local/lib/php/Smarty/. I started out with only the following: /usr/local/lib/ so I had to create two directories which I did using the terminal, like so:

$> cd /usr/local/lib/
$> mkdir /usr/local/lib/php/
$> mkdir /usr/local/lib/php/Smarty/


Once the directories are set up now we will copy the library files from the download and put the copies in the Smarty folder. I did this using the terminal:


$> sudo cp -r /var/www/smarty/Smarty-2.6.20/libs/* /usr/local/lib/php/Smarty


Now my directory and file structure for Smarty should look like this:


/usr/local/lib/php/Smarty/
Config_File.class.php
debug.tpl
internals/
plugins/
Smarty.class.php
Smarty_Compiler.class.php


Now going back to the QUICK_START instructions. The next step is to create four directories that Smarty needs to work.

my document root is var/www/website so I decided to put the Smarty files under /var/www/website/smarty. Using the terminal again I create the directories as follows:
$> cd /var/www/
$> mkdir smarty
$> mkdir smarty/templates
$> mkdir smarty/templates_c
$> mkdir smarty/cache
$> mkdir smarty/configs
$> sudo chown user:pass smarty/cache
$> sudo chown user:pass smarty/templates_c
$> chmod 775 smarty/templates_c
$> chmod 775 smarty/cache
The next step now is to create the Smarty PHP script:

$> cd /var/www/
$> mkdir myapp
$> gedit index.php
The gedit text editor opens and you cut and paste the following and save the file at index.php inside the myapp directory.

template_dir = '/web/www.domain.com/smarty/templates';
$smarty->compile_dir = '/web/www.domain.com/smarty/templates_c';
$smarty->cache_dir = '/web/www.domain.com/smarty/cache';
$smarty->config_dir = '/web/www.domain.com/smarty/configs';

$smarty->assign('name', 'Ned');
$smarty->display('index.tpl');

Change the values for your own specific situation. My webroot is located at /var/www and therefore my values were:

template_dir = '/var/www/smarty/templates';
$smarty->compile_dir = '/var/www/smarty/templates_c';
$smarty->cache_dir = '/var/www/smarty/cache';
$smarty->config_dir = '/var/www/smarty/configs';

$smarty->assign('name', 'Ned');
$smarty->display('index.tpl');

Save as index.php in the myapp folder.

Now we setup the Smarty Template, here is our template:

(click image to enlarge)


Save this as index.tpl in this folder: /var/www/smarty/template/

Finally, it's time to test if the installation is working. Go into your browser and type http://localhost/myapp/index.php

If you see "Hello, Ned!" displaying on the screen it means you have successfully installed the Smarty Template Engine.

Once you succeed at this it's time to take the Crash Course on the Smarty website.

Use phpinfo() to find php.ini location and to check your PHP configuration settings

phpinfo() can be used to check your PHP configuration. For example,

(click image to enlarge)

When you run this script in your browser, (in my case it is http://localhost/phpinfo.php) you should get a response similar to the following:

(click image to enlarge)


As you can see a lot of info is displayed and you will have to scroll down quite a bit to read the whole page.

Notice the fifth item is the php.ini path. This tells you where you can find php.ini which is the php configuration file. The sixth item is the actual file itself. So now you know where to locate php.ini if you want to make any changes.


How to verify which version of Ubuntu you are running

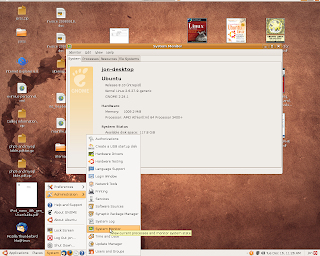
This is how to verify which version of Ubuntu you have installed. Go to System, Administration, and select System Monitor, as follows:

(click to enlarge)

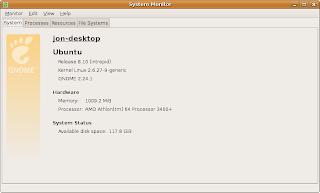
The System Monitor window will open. Select the first tab which is called "system" and you should see something similar to the following:

(click to enlarge)

In this case you can see I have Ubuntu Release 8.10 (intrepid).

Knowing this basic info about your setup will be useful when you are seeking advice in Ubuntu forums such as ubuntuforums.org

Followers